Image Segmentation DeepLabV3 on Android
Author: Jeff Tang
Reviewed by: Jeremiah Chung
Introduction
Semantic image segmentation is a computer vision task that uses semantic labels to mark specific regions of an input image. The PyTorch semantic image segmentation DeepLabV3 model can be used to label image regions with 20 semantic classes including, for example, bicycle, bus, car, dog, and person. Image segmentation models can be very useful in applications such as autonomous driving and scene understanding.
In this tutorial, we will provide a step-by-step guide on how to prepare and run the PyTorch DeepLabV3 model on Android, taking you from the beginning of having a model you may want to use on Android to the end of having a complete Android app using the model. We will also cover practical and general tips on how to check if your next favorable pre-trained PyTorch models can run on Android, and how to avoid pitfalls.
Note
Before going through this tutorial, you should check out PyTorch Mobile for Android and give the PyTorch Android HelloWorld example app a quick try. This tutorial will go beyond the image classification model, usually the first kind of model deployed on mobile. The complete code repo for this tutorial is available here.
Learning Objectives
In this tutorial, you will learn how to:
Convert the DeepLabV3 model for Android deployment.
Get the output of the model for the example input image in Python and compare it to the output from the Android app.
Build a new Android app or reuse an Android example app to load the converted model.
Prepare the input into the format that the model expects and process the model output.
Complete the UI, refactor, build and run the app to see image segmentation in action.
Pre-requisites
PyTorch 1.6 or 1.7
torchvision 0.7 or 0.8
Android Studio 3.5.1 or above with NDK installed
Steps
1. Convert the DeepLabV3 model for Android deployment
The first step to deploying a model on Android is to convert the model into the TorchScript format.
Note
Not all PyTorch models can be converted to TorchScript at this time because a model definition may use language features that are not in TorchScript, which is a subset of Python. See the Script and Optimize Recipe for more details.
Simply run the script below to generate the scripted model deeplabv3_scripted.pt:
import torch

# use deeplabv3_resnet50 instead of resnet101 to reduce the model size
model = torch.hub.load('pytorch/vision:v0.7.0', 'deeplabv3_resnet50', pretrained=True)
model.eval()

scriptedm = torch.jit.script(model)
torch.jit.save(scriptedm, "deeplabv3_scripted.pt")
The size of the generated deeplabv3_scripted.pt model file should be around 168MB. Ideally, a model should also be quantized for significant size reduction and faster inference before being deployed on an Android app. To have a general understanding of quantization, see the Quantization Recipe and the resource links there. We will cover in detail how to correctly apply a quantization workflow called Post Training Static Quantization to the DeepLabV3 model in a future tutorial or recipe.
2. Get example input and output of the model in Python
Now that we have a scripted PyTorch model, let’s test with some example inputs to make sure the model works correctly on Android. First, let’s write a Python script that uses the model to make inferences and examine inputs and outputs. For this example of the DeepLabV3 model, we can reuse the code in Step 1 and in the DeepLabV3 model hub site. Add the following code snippet to the code above:
from PIL import Image
from torchvision import transforms
input_image = Image.open("deeplab.jpg")
preprocess = transforms.Compose([
    transforms.ToTensor(),
    transforms.Normalize(mean=[0.485, 0.456, 0.406], std=[0.229, 0.224, 0.225]),
])

input_tensor = preprocess(input_image)
input_batch = input_tensor.unsqueeze(0)
with torch.no_grad():
    output = model(input_batch)['out'][0]

print(input_batch.shape)
print(output.shape)
Download deeplab.jpg from here, then run the script above and you will see the shapes of the input and output of the model:
torch.Size([1, 3, 400, 400])
torch.Size([21, 400, 400])
So if you provide the same image input deeplab.jpg of size 400x400 to the model on Android, the output of the model should have the size [21, 400, 400]. You should also print out at least the beginning parts of the actual data of the input and output, to be used in Step 4 below to compare with the actual input and output of the model when running in the Android app.
3. Build a new Android app or reuse an example app and load the model
First, follow Step 3 of the Model Preparation for Android recipe to use our model in an Android Studio project with PyTorch Mobile enabled. Because both DeepLabV3 used in this tutorial and MobileNet v2 used in the PyTorch HelloWorld Android example are computer vision models, you can also get the HelloWorld example repo to make it easier to modify the code that loads the model and processes the input and output. The main goal in this step and Step 4 is to make sure the model deeplabv3_scripted.pt generated in Step 1 can indeed work correctly on Android.
Now let’s add deeplabv3_scripted.pt and deeplab.jpg used in Step 2 to the Android Studio project and modify the onCreate method in the MainActivity to resemble:
Module module = null;
try {
  module = Module.load(assetFilePath(this, "deeplabv3_scripted.pt"));
} catch (IOException e) {
  Log.e("ImageSegmentation", "Error loading model!", e);
  finish();
}
Then set a breakpoint at the line finish() and build and run the app. If the app doesn’t stop at the breakpoint, it means that the scripted model in Step 1 has been successfully loaded on Android.
4. Process the model input and output for model inference
After the model loads in the previous step, let’s verify that it works with expected inputs and can generate expected outputs. As the model input for the DeepLabV3 model is an image the same as that of the MobileNet v2 in the HelloWorld example, we will reuse some of the code in the MainActivity.java file from HelloWorld for input processing. Replace the code snippet between line 50 and 73 in MainActivity.java with the following code:
final Tensor inputTensor = TensorImageUtils.bitmapToFloat32Tensor(bitmap,
        TensorImageUtils.TORCHVISION_NORM_MEAN_RGB,
        TensorImageUtils.TORCHVISION_NORM_STD_RGB);
final float[] inputs = inputTensor.getDataAsFloatArray();

Map<String, IValue> outTensors =
    module.forward(IValue.from(inputTensor)).toDictStringKey();

// the key "out" of the output tensor contains the semantic masks
// see https://pytorch.org/hub/pytorch_vision_deeplabv3_resnet101
final Tensor outputTensor = outTensors.get("out").toTensor();
final float[] outputs = outputTensor.getDataAsFloatArray();

int width = bitmap.getWidth();
int height = bitmap.getHeight();
Note
The model output is a dictionary for the DeepLabV3 model so we use toDictStringKey to correctly extract the result. For other models, the model output may also be a single tensor or a tuple of tensors, among other things.
With the code changes shown above, you can set breakpoints after final float[] inputs and final float[] outputs, which populate the input tensor and output tensor data to float arrays for easy debugging. Run the app and when it stops at the breakpoints, compare the numbers in inputs and outputs with the model input and output data you see in Step 2 to see if they match. For the same inputs to the models running on Android and Python, you should get the same outputs.
Warning
You may see different model outputs with the same image input when running on an Android emulator due to some Android emulator’s floating point implementation issue. So it is best to test the app on a real Android device.
All we have done so far is to confirm that the model of our interest can be scripted and run correctly in our Android app as in Python. The steps we walked through so far for using a model in an iOS app consumes the bulk, if not most, of our app development time, similar to how data preprocessing is the heaviest lift for a typical machine learning project.
5. Complete the UI, refactor, build and run the app
Now we are ready to complete the app and the UI to actually see the processed result as a new image. The output processing code should be like this, added to the end of the code snippet in Step 4:
int[] intValues = new int[width * height];
// go through each element in the output of size [WIDTH, HEIGHT] and
// set different color for different classnum
for (int j = 0; j < width; j++) {
    for (int k = 0; k < height; k++) {
        // maxi: the index of the 21 CLASSNUM with the max probability
        int maxi = 0, maxj = 0, maxk = 0;
        double maxnum = -100000.0;
        for (int i=0; i < CLASSNUM; i++) {
            if (outputs[i*(width*height) + j*width + k] > maxnum) {
                maxnum = outputs[i*(width*height) + j*width + k];
                maxi = i; maxj = j; maxk= k;
            }
        }
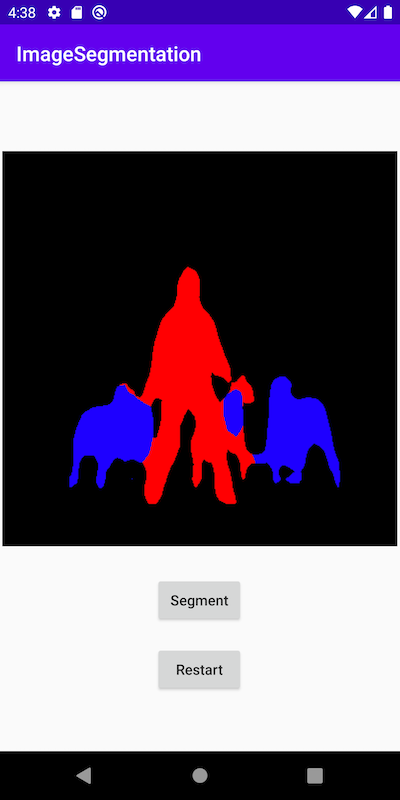
        // color coding for person (red), dog (green), sheep (blue)
        // black color for background and other classes
        if (maxi == PERSON)
            intValues[maxj*width + maxk] = 0xFFFF0000; // red
        else if (maxi == DOG)
            intValues[maxj*width + maxk] = 0xFF00FF00; // green
        else if (maxi == SHEEP)
            intValues[maxj*width + maxk] = 0xFF0000FF; // blue
        else
            intValues[maxj*width + maxk] = 0xFF000000; // black
    }
}
The constants used in the code above are defined in the beginning of the class MainActivity:
private static final int CLASSNUM = 21;
private static final int DOG = 12;
private static final int PERSON = 15;
private static final int SHEEP = 17;
The implementation here is based on the understanding of the DeepLabV3 model which outputs a tensor of size [21, width, height] for an input image of width*height. Each element in the width*height output array is a value between 0 and 20 (for a total of 21 semantic labels described in Introduction) and the value is used to set a specific color. Color coding of the segmentation here is based on the class with the highest probability, and you can extend the color coding for all classes in your own dataset.
After the output processing, you will also need to call the code below to render the RGB intValues array to a bitmap instance outputBitmap before displaying it on an ImageView:
Bitmap bmpSegmentation = Bitmap.createScaledBitmap(bitmap, width, height, true);
Bitmap outputBitmap = bmpSegmentation.copy(bmpSegmentation.getConfig(), true);
outputBitmap.setPixels(intValues, 0, outputBitmap.getWidth(), 0, 0,
    outputBitmap.getWidth(), outputBitmap.getHeight());
imageView.setImageBitmap(outputBitmap);
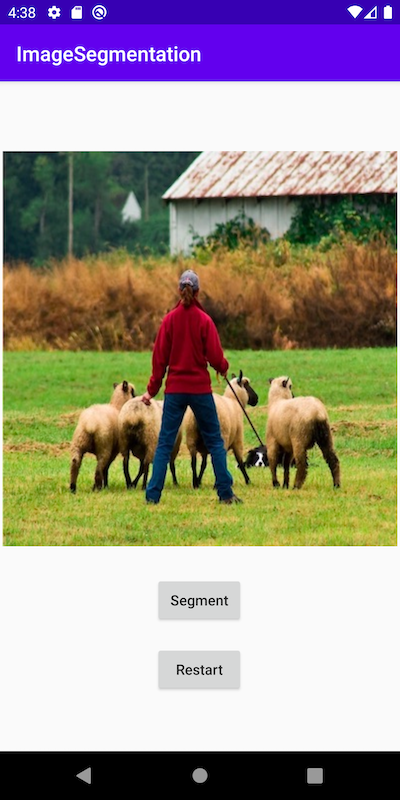
The UI for this app is also similar to that for HelloWorld, except that you do not need the TextView to show the image classification result. You can also add two buttons Segment and Restart as shown in the code repo to run the model inference and to show back the original image after the segmentation result is shown.
Now when you run the app on an Android emulator or preferably an actual device, you will see screens like the following:


Recap
In this tutorial, we described what it takes to convert a pre-trained PyTorch DeepLabV3 model for Android and how to make sure the model can run successfully on Android. Our focus was to help you understand the process of confirming that a model can indeed run on Android. The complete code repo is available here.
More advanced topics such as quantization and using models via transfer learning or of your own on Android will be covered soon in future demo apps and tutorials.


